Intro
Recently I released
WpWinlMaps for the Universal Windows Platform, a NuGet package that allows you to data bind map shapes to the awesome new map control for Windows 10. This map control got recently even more awesome with SDK 10586, when
multipolygons, aka polygons with holes, aka donuts where added to it. For those who have read this blog before, this binding code should not come as a surprise - I basically did this already in
2012 for the Bing Maps control for Windows, and there are incarnations of this for
Windows Phone 8 and the
Here Maps control for Windows Phone 8.1. The UWP binding - of course built as a behavior - is an evolution of the Windows Phone 8.1 behavior. It's most important new features are:
- It's built on top of the new UWP Behaviors NuGet Package
- MapShapeDrawBehavior can now also draw multi polygons (with holes)
- The geometry type used to support Geopath only (even if you wanted to draw just a MapIcon). Now you can use a BasicGeoposition for MapIcon, a Geopath for MapPolyline or a 'normal' MapPolygon, and an IList<Geopath> to create the new type of polygons-with-holes that I mentioned earlier.
- MapShapeDrawBehavior supports the new MapElementClick event for selecting objects on the map (and still supports the old MapTapped event, as well as Tapped, although the last one is still not recommended for use)
- The EventToCommandMapper is renamed to EventToHandlerMapper; now it can not only call a command, but also directly a method of the view model. This is to align with the way x:Bind introduces calling direct events as well.
- Speaking of - x:Bind to the MapShapeDrawBehavior's ItemSource is fully supported, although that's 99% thanks to the platform and 1% to my coding.
Getting started
Create a project, add the WpWinNl NuGet package to it. This will pull in the WpWinNlBasic package as well, as well as - of course Microsoft.Xaml.Behaviors.Uwp.Managed, and Rx-Linq because I use that to dynamically react on events.
Then, of course, you will need some MVVM framework, be it something that you make yourself or something that is made by someone else. In my sample I opted for pulling in
MVVMLight, this being more or less an industry standard now. I also pulled in WpWinNl full, because I use some more features from it in my sample code. And that automatically pulls in MVVMLight too, so that saves you the trouble of doing that yourself ;)
Concepts
These are basically still the same, but I will repeat them here for your convenience.
Typically, maps are divided into
layers. You can think of this as logical units representing one class of real-world objects (or ‘features’ as they tend to be called in the geospatial word). For instance, “houses”, “gas stations”, “roads”. In WpWinNlMaps, a layer translates to one behavior attached to the map.
A MapShapeDrawBehavior contains the following properties
- ItemsSource – this is where you bind your business objects/view models to.
- PathPropertyName – the name of the property in a bound object that contains the BasicGeoposition, the Geopath or the IList<Geopath> describing the object’s location
- LayerName – the name of the layer. Make sure this is unique within the map
- ShapeDrawer – the name of the class that actually determines how the shape in PathPropertyName is actually displayed
- EventToCommandMappers – contains a collection of events of the map that need to be trapped, mapped to a command or a method of the bound object that needs to be called when the map receives this event. Presently, the only events that make sense are "MapClicked", “MapTapped” and “Tapped”.
Sample
As always, a sample says more than a 1000 words. Our view model has a property
MultiPolygons = new ObservableCollection<MultiPathList>();
And a MultiPathList indeed as a
public List<Geopath> Paths { get; set; }Drawing a set of polygons with holes in it, is as easy as
<maps:MapControl x:Name="MyMap" Grid.Row="0">
  <interactivity:Interaction.Behaviors>
    <mapbinding:MapShapeDrawBehavior LayerName="MultiShapes"
        ItemsSource="{x:Bind ViewModel.MultiPolygons,
          Converter={StaticResource MapObjectsListConverter}}"
        PathPropertyName="Paths">
      <mapbinding:MapShapeDrawBehavior.EventToHandlerMappers>
        <mapbinding:EventToHandlerMapper EventName="MapElementClick"
                                         MethodName="Select"/>
      </mapbinding:MapShapeDrawBehavior.EventToHandlerMappers>
      <mapbinding:MapShapeDrawBehavior.ShapeDrawer>
        <mapbinding:MapMultiPolygonDrawer
          Color="OrangeRed" StrokeColor="Crimson"
          Width="2" StrokeDashed="True"/>
      </mapbinding:MapShapeDrawBehavior.ShapeDrawer>
    </mapbinding:MapShapeDrawBehavior>
  </interactivity:Interaction.Behaviors>
</maps:MapControl>
So what we have here is a MapShapeDrawBehavior that binds to ViewModel.MultiPolygon, using a converter. Unfortunately, due to the nature of x:Bind, you will always need to use this converter. If you don't, you will run into this error:
"XamlCompiler error WMC1110: Invalid binding path 'ViewModel.MultiPolygons' : Cannot bind type 'System.Collections.ObjectModel.ObservableCollection(WpWinNl.MapBindingDemo.Models.MultiPathList)' to 'System.Collections.Generic.IEnumerable(System.Object)' without a converter". So I give it a converter to make it happy, although the convert method of the MapObjectsListConverter in fact only is this
public override object Convert(object value, Type targetType,
                               object parameter, CultureInfo culture)
{
  return value;
}
If you have been working as a career developer for 23 you learn it's best just not get wound up about these kinds of things and just happily accept a feasible work-around :)
Event handling
Next up is the EventToHandlerMapper; in its EventName you can put the following event names:
- MapElementClick
- MapTapped
- Tapped
And I recommend you use MapElementClick as that provides the least overhead and is the preferred new event. The other two will work too. Any other events, how valid they might be, are ignored.
The EventToHandlerMapper has two other properties: MethodName and CommandName. The first one is checked first, so if you are a smartypants who defines them both, only MethodName is used. Once again - this is a method or a command on the
bound object, not the view model that hosts the ItemSource. The method or command should take a MapSelectionParameters object as a parameter. In the sample code you will see a class GeometryProvider that actually implements both, utilizing standard MVVMLight code:
public class GeometryProvider : ViewModelBase
{
  public string Name { get; set; }

  public ICommand SelectCommand => new RelayCommand<MapSelectionParameters>(Select);

  public void Select(MapSelectionParameters parameters)
  {
    DispatcherHelper.CheckBeginInvokeOnUI(
      () => Messenger.Default.Send(
         new MessageDialogMessage(Name, "Selected object", "Ok", "Cancel")));
  }
}
I use this as a base class for all types that I bind to the MapShapeDrawBehavior to provide an easy base for event handling.
Shape drawers
These are classes that for actually converting the geometry into an actual shape, that is, a MapIcon, a MapPolyline, or a MapPolygon. Out of the box, there are four drawers with the following properties:
- MapIconDrawer
- MapPolylineDrawer
- Color - line color
- StrokeDashed - dashed or solid line
- Width - line width
- MapPolygonDrawer
- Color - shape fill color
- StrokeDashed - dashed or solid shape outline
- StrokeColor - shape outline color
- Width - shape outline width
- MapPolylineDrawer
In addition, all drawers support a Z-index property.
Thematic maps - making your own shape drawers
I wish to stress that is does not end with the four default drawers. If you want map elements to change color or other properties based upon values in object that you bind to - there is nothing that keeps you from doing that. You can do this by making by sub classing an existing drawer (or make a completely new one). Suppose you have this business object:
public class CustomObject
{
  public string Name { get; set; }
  public BasicGeoposition Point { get; set; }

  public int SomeValue { get; set; }
}
And you want to have the color of the line to change based on the SomeValue property, you can achieve this by writing something like this:
public class MyLineDrawer : MapPolylineDrawer
{
  public override MapElement CreateShape(object viewModel, Geopath path)
  {
    var shape = (MapPolyline)base.CreateShape(viewModel, path);
    var myObject = (CustomObject)viewModel;
    switch (myObject.SomeValue)
    {
      case 0:
        {
          shape.StrokeColor = Colors.Black;
          break;
        }
      case 1:
        {
          shape.StrokeColor = Colors.Red;
          break;
        }

      //etc
    }
    return shape;
  }
}
Drawer class hierarchy
The class drawers are built according to the following class hierarchy
I'd recommend overriding only the concrete classes when creating custom drawers. Be aware there are three virtual methods in MapShapeDrawer that you can override:
public abstract class MapShapeDrawer
{
  public virtual MapElement CreateShape(object viewModel, BasicGeoposition postion)
  {
    return null;
  }

  public virtual MapElement CreateShape(object viewModel, Geopath path)
  {
    return null;
  }

  public virtual MapElement CreateShape(object viewModel, IList<Geopath> paths)
  {
    return null;
  }

  public int ZIndex { get; set; }
}
Make sure you override the right method for the right goal:
- CreateShape(object viewModel, BasicGeoposition postion) when you are dealing with icons
- CreateShape(object viewModel, Geopath path) when you are dealing with lines or polygons
- CreateShape(object viewModel, IList<Geopath> paths) when are are dealing with multipolygons
Limitations
Be aware this binding method respond to changes in the
list of bound objects - that is, if you add or remove an object to or from the bound list, it will be drawn of the map or removed from it. If you change properties
within the individual objects after binding and drawing, for instance the color, those will not reflect on the map - you will have to replace the object in the list.
Sample solutions
This article comes not with one but
two samples - it's amazing Mike! ;). The first one is actually in the code on GitHub and you can find it
here. The drawback of that sample it that it actually requires you to compile the whole library as it uses the sources directly - it was my own test code. So for your convenience I made more or less the same solution, but then using the NuGet packages. You can find that
here - it's an old skool downloadable ZIP file as I don't want to confuse people on GitHub. Both solutions work the same and show the same data as
in an earlier post where I described the multipolygon feature first.

A little word of guidance – after your start either demo app, first go to the ellipses on the right, tap those and hit “show area”. That will bring you to the right location to show all the features that this app can draw.
Conclusion
I hope that this little library is as useful as its earlier incarnations proved to be. I have actually utilized the wp8.1 version in one of my own apps, I know there is a good chance of more apps are using it, and also that some Microsofties are actually recommending it ;). I hope it's useful for you. Let me know what you think about this. In the mean time, happy mapping!


 does not even get called the first time. I spent a not so enjoyable hour deconstructing my app, then finally building a bare bones repro – and there it happened too. One of those moment where you seriously start to doubt your own mental health.
The code is not very complicated. I have a MainPage.xaml with a button on a SplitView, and when you click that, it navigates to the next page
does not even get called the first time. I spent a not so enjoyable hour deconstructing my app, then finally building a bare bones repro – and there it happened too. One of those moment where you seriously start to doubt your own mental health.
The code is not very complicated. I have a MainPage.xaml with a button on a SplitView, and when you click that, it navigates to the next page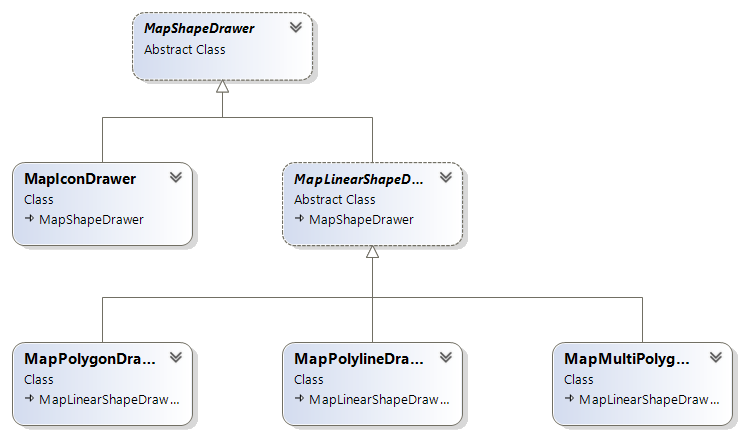


![image[9]](http://www.schaikweb.net/dotnetbyexample/Drawing-polygons-with-holes-donuts-on-Wi_1193A/image9.png "image[9]")